The memories micro SD They have become tremendously popular in recent times, and as a tool of daily use that they are, there are not a few that break down, become corrupted or simply decide to leave this world in search of universal peace.
Today we can find micro SD cards in mobile phones, tablets, digital cameras, laptops and practically any device that we can think of. Some of the most common errors that we can see in systems such as Android or Windows they usually look like this:
- "SD card error."
- "SD card damaged" or "SD card is damaged."
- "Drive (E :) is not accessible."
- "The file or folder is damaged and cannot be read."
To solve this and recover the data that the micro SD contains, we will need 2 things:
- A Desktop PC (Windows).
- A adapter for micro SD. If our equipment has a micro SD slot, perfect. If not we will need an adapter SD / Micro SD or USB / Micro SD to insert the card. They are usually quite cheap and we can get one through Amazon for just over 1 euro.
Before starting, remember the importance of backing upevery so often, especially on mobile devices. You can read a more detailed explanation of how to carry out this process in the post "How to make a backup on Android". Let's go to the mess!
Run the chkdsk command to repair micro SD corruption
The first step will consist of connect the micro SD card to a Windows computer (If we use an SD adapter, make sure we have the card's write tab enabled). In this case we will have 2 possible casuistics:
- The pc He does not recognize the D.
- The pc recognize the SD card.
If Windows recognizes the drive, we will write down the name of the assigned letter and we will open an MS-DOS window as administrator. To do this, just write “cmd"In Cortana and run as administrator (right click) the application"Symbol of the system”.

Next, we will write the following command (where "F:" corresponds to the letter assigned to our SD):

With the command chkdsk / x / f the system will look for errors on the micro SD card and if you find any will try to repair it. It is a utility that works quite well, and usually solves most problems of this type.
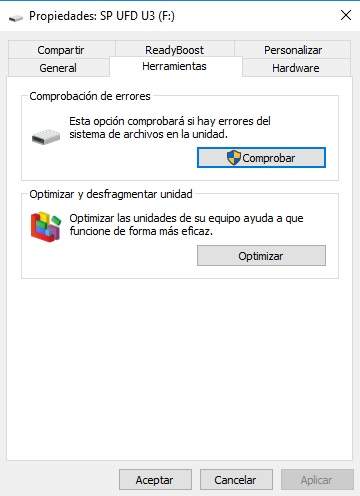
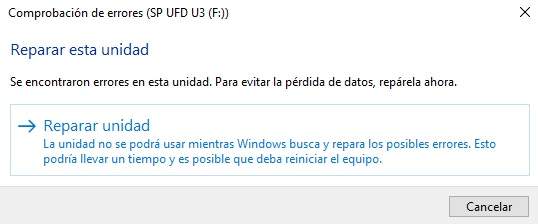
We can also use another method to repair the card, which is to go to the SD drive within "Team”And by right-clicking on“Properties" to select "Tools ->Check (Checking for errors) ”.
Assign a new drive letter (the system does not recognize the SD)
If Windows does not detect the card the problem can be quite serious, but still we can try to recover our data. To do this, we open the window of "Disk management" (from "Create and format hard drive partitions"In the Windows 10 Control Panel), we locate our unit (here it should appear), and with the right button we select"Change drive letter and paths”, Assigning a new letter to the unit (the one we want, but which is free).

With this, the system should detect the memory card again, which will allow us make a copy of all the files it contains or try to recover them with some data recovery program.
If the unit of your card appears in RAW format, that means the file system is out of format and corrupt. In these cases the only solution is to format the drive, but not before trying to recover everything that can be done with a specific application that is capable of reading RAW partitions, such as ZAR data recovery (also available for Linux).
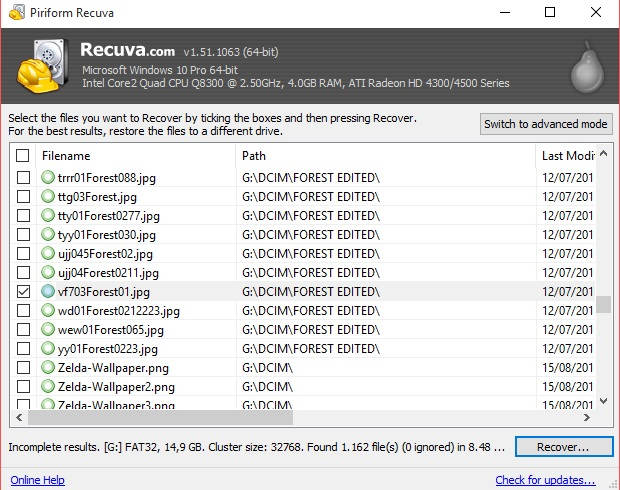
Recover files deleted with Recuva or similar
Once Windows is able to read the SD we have to try to save as much data as possible. A good option is to transfer all the data to the hard disk of the computer, but if files are missing (photos, videos, documents etc.) we will need a data recovery program to extract as much information as possible.
There are a thousand applications to recover data. The one that has worked best for me so far has been “Recuva"(Free), but the truth is that in the long run the ones that usually offer the best performance are applications that require a license, such as DiskDigger or Get Data Back.
Important: Whenever we launch recovery scans we must mark the scan option type "deep scan”Or deep scan to get good results.
 Whenever you perform scans mark “deep scan” for a better tracking
The application DiskDigger also has an app version for Android that we can use to recover our photos and files, but we will need root permissions for it to unfold its full potential (of course, always bearing in mind that the desktop version is much more effective).

 Download QR-Code DiskDigger Recover Photos Developer: Defiant Technologies, LLC Price: Free
 Format the micro SD memory
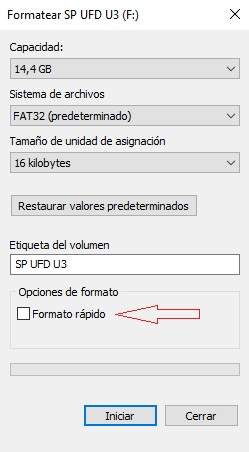
Once the data is recovered, it is best to completely format the SD card. This way we ensure that our removable memory is healthy and 100% operational again.
To perform the format, just go to "Computer" or "My Computer" and right-clicking on the removable drive select "Format”. In these cases it is best to leave the option of "Quick format”.
Formatting the micro SD with the DISKPART command
If the quick format does not work we can always try to format the card by hand, using commands. To do this, we reopen an MS-DOS window as administrator and launch the following series of commands in an orderly manner:
- “diskpart”: With this command we access the disk partition.
- “list disk”: Now we ask the system to show us a list of the disks. We will identify the SD by the size shown on each of the disks.
- “select disk NUMERO_DE_DISCO_DEL_USB": If the SD corresponds to disk 2, for example, we will write the command"select disk 2”.

- “clean”: With this command we clean the memory of the micro SD card.
- “create partition primary”: Now we will create a primary partition.
- “select partition 1”: We choose the partition we just created.
- “active”: We mark the partition as active.
- “format fs = FAT32”: Finally, with this command we format the SD memory.
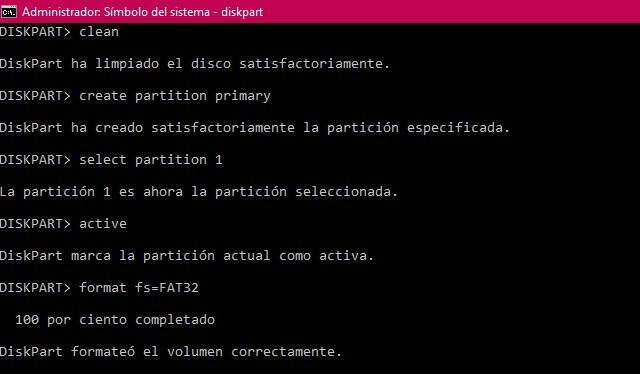
If everything went well, we will have a clean and perfectly formatted SD card.
Other alternatives: Use a partition management and administration tool like Partition Master
Whenever we run into problems recognizing disk drives I usually recommend using some partition manager application to do your dirty work. They tend to make the formatting and repair process quite easy, and it is a type of tool that never hurts in our particular library of desktop applications.
One of the most practical and easy to use in this area is the application EaseUS Partition Master. In this way, we can carry out the steps that we have indicated previously directly from the tool, without manually entering any command:
- Once the SD is connected to the PC, we open Partition Master. We select the damaged unit by right clicking with the mouse and click on «Check partition«.
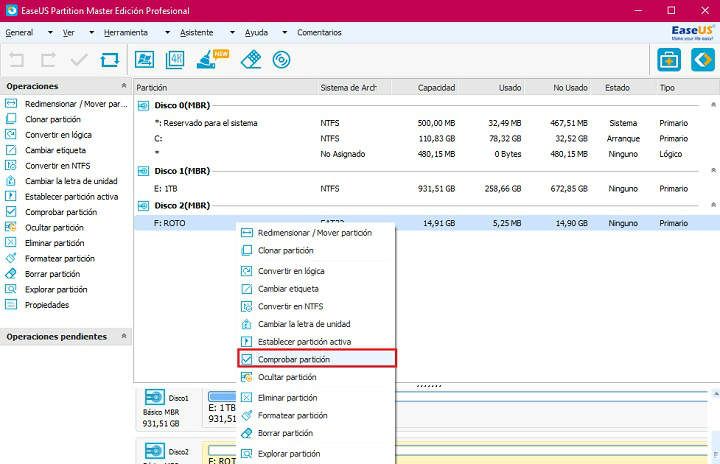
- We left marked the 3 checks («Check partition properties »,« Require Windows chkdsk.exe to correct errors" and "Surface test«). We select «OK». The system will make the necessary repairs. This is a process that can take several minutes.

- If none of this works, we will format the unit by selecting with the right button and clicking on «Format partition«.
- In the new window that will open before us, we will have the option to label the unit, choose the file system (NTFS, FAT32, ReFS, EXT3 and EXT2) and the size of the cluster. Click on «OK» to perform the formatting.

You can get more information about how to repair a corrupted SD with Partition Master from the developers' own website.
In short, if we have a micro SD card that is damaged or unreadable, it is best to try to recover the data first and then, even if it seems that everything is ok, give the card a good format. Either by hand, or with the help of a partition manager. Otherwise, it is likely that we will have the same problem again at the first exchange. Save your data, friend! Save the cheerleader, save the world!
You have Telegram installed? Receive the best post of each day on our channel. Or if you prefer, find out everything from our Facebook page.