What good is a mobile phone that cannot access the Internet? The truth is that we are a bit lame. If we have run out of data, we will most likely try to hook up to a wireless network, using applications such as WiFi Master Key to discover free access points around us.
WiFi is also the most practical solution, especially if we are at home, but what happens if the signal that reaches our Android is very weak? In this case, it is best to sit down and spend 5 minutes improve the quality of said wireless network. We will certainly appreciate it in the long run!
How to improve WiFi quality on Android devices
When attacking a problem with a weak or too weak WiFi signal, we must do it through 2 well-differentiated fronts. On the one hand, there are the actions that we can carry out on our phone or tablet, and on the other, the configuration settings that we can apply directly to the router. Let's see what they consist of.
From the phone
Before starting to get your hands on the router, it is advisable to perform certain “maintenance” tasks on the phone.
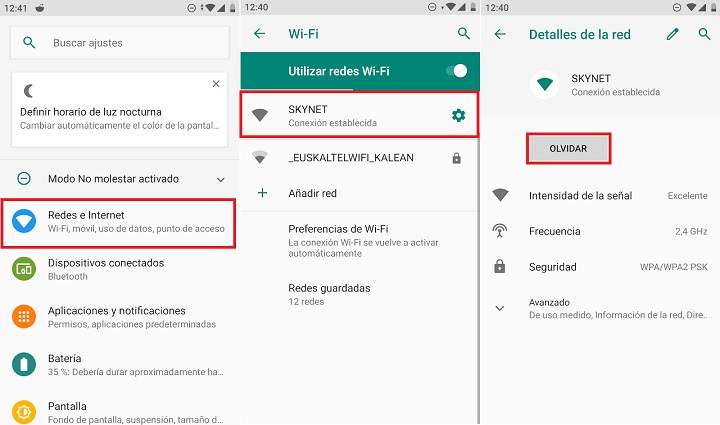
Forget the WiFi network and reconnect
When we have a Wi-Fi connection problem, the first thing we should do is clear the network configuration data and reconnect. This tends to work especially well when it comes to one-off failures.
We just have to go to “Settings -> Networks and internet", Click on the active Wi-Fi connection and in the network details, select"Forget”. In this way, our Android will erase all the connection settings, as well as the access password. If we had a low-range problem, it will most likely be solved "automatically" when we reconnect.
Find the frequencies and channels less traveled
If, after forgetting and reconfiguring the connection, it still does not go as fast as we want, we must take a little more drastic measures: it is time to roll up your sleeves and put your hands a little in the mud.
To do this, we will install the WiFi Analyzer app (or other alternatives such as ESTA) to check the channels and frequencies of the networks that we have around us. This is a piece of information that will help us to know which broadcast channels are the least used. In this way, we can go to the configuration settings of our router and adjust it so that the Wi-Fi of our neighbors does not create interference and we have a connection of much better quality.

 Download QR-Code Wifi Analyzer Developer: farproc Price: Free
 Note: For WiFi Analyzer to work properly, it is necessary to give location permissions to the application (from the "Settings -> Applications" menu of the system).
Currently, WiFi signals are broadcast through 2 frequencies: 2.4GHz and 5GHz. In turn, each of these frequencies has different emission bands, also called “channels”. Thus, the 2.4GHz frequency has approximately 11 channels, with the 5GHz frequency being the widest, with 45 channels.
That said, we will open the WiFi Analyzer app and once the scan is done, we will see on which channel both our wifi and that of our closest networks broadcast. This will also allow us to see which channels are free.

Now that we know this, the next step is more than obvious: enter the router's configuration menu and change the channel of our WiFi network.
From the router
In order to enter the router we will need 2 data:
- The IP address or gateway of the router.
- The access username / password (not to be confused with the username / password to connect to the WiFi network).
If you have problems accessing it, take a look at the post "How to access a router".
The configuration panel of each router is different, although in most cases they have quite similar interfaces. For example, in the settings of the TP-Link router in the image below, we can modify the channel from the menu "Wireless Network -> Wireless Network Settings”.

Once we have found the section that refers to the channel, we just have to change it for one that is free (according to the data collected with the Wifi Analyzer app).
Remember that the 5GHz frequency is usually less used, so if you have a compatible router, it is likely that you will find more free channels on this frequency. Of course, although the transmission speed is much more powerful in 5GHz wireless networks, the range is also much more limited.
Install a Wi-Fi repeater in the areas furthest from the router
If after changing the channel we still receive a very weak signal in some rooms, it is recommended install a wifi repeater. They are not very expensive - they are usually around 20 or 30 euros - and they will help us to amplify the signal throughout the house. I currently use the TP-Link N300 TL-WA850RE, and for a medium size floor the truth is that it works very well.

Related post: The 7 best wifi repeaters for home
How to improve the Wi-Fi signal when we are on the street
All this is fine if we are at home, but when we are in public places connected to other networks, we obviously cannot touch the router. Although in these situations the options are much more limited, we can always keep this couple of tips in mind:
- Don't move too much: If we are connected to the Wi-Fi of a library or a shopping center and we do not stop moving, we will jump from one access point to another. This causes the signal to weaken.
- Avoid obstacles: WiFi often has trouble getting through walls. Other objects such as doors and other obstacles can also weaken the wireless signal. Try to stay in the largest rooms (or as close as possible to the router or a repeater).
If you found this post interesting, you can find more similar content in the section Connectivity.
You have Telegram installed? Receive the best post of each day on our channel. Or if you prefer, find out everything from our Facebook page.