One of the advantages of using Android is that we can access the “depths” of our device and touch practically everything. To the unfathomable and beyond. To do this, Android offers us several tools, such as, for example, the ADB (Android Debug Bridge o Android Debugging Bridge).
The ADB is a program that is included in the Android development kit (Android Studio), and includes a series of commands that we can execute in a simple command window to communicate with our device directly from a PC.
In addition to those mentioned ADB commands, we can also use the so-called commands of fastboot, a series of commands that we can use from the Android bootloader, without actually entering the operating system.
In short, 2 tools that are great for us if we want to install Custom ROMs, root or just learn a little more about Android.
Requirements for using the ADB and Fastboot commands
In order to use the ADB commands and communicate with an Android device, we must download and install the one known as Android Studio or Android SDK. It can be downloaded from the official Android development page.
In the event that we work with Windows, we will simply have to run the package that we just downloaded. If we have any questions, we can consult the installation manual. Users of Linux and Mac They also have their corresponding versions on the aforementioned Android Studio official page.
Finally, remember that it is necessary enable USB debugging from the terminal. In addition, we will have to install the corresponding device drivers in the computer.
The 10 most used ADB commands
Here are some of the most common ADB commands used to interact with an Android phone or tablet.
For the commands to work correctly we must open the system terminal and go to the same path where we have installed the Android development package (usually in C: / or the program files).
If at any time we want to transfer or call a file, it is recommended that is located on this same route.
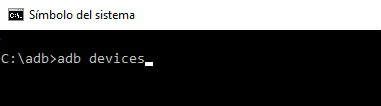
1 # adb devices
The "adb device" command is one of the most basic. It is used to know if the device is communicating correctly with the PC. We open a system terminal and type the command directly. If everything has gone well, we will be shown a list of the connected devices with their respective serial number and status.
2 # adb install
This one seems pretty obvious, right? With this command line we can install applications in apk format on the device, directly from the command console of our PC.
adb install app.apk
For instance: adb install whatsapp.apk
3 # adb push
With "adb push" we can transfer files from the PC to the indicated path of the Android device. It is enough to leave the file in the same path where we are in the command window and write the following:
Adb push filename destination_path
For instance: adb push movie.mp4 / sdcard / movies
4 # adb pull
In this case, what we will do is the opposite way: copy files from the device to the PC. The file will be copied to the same path where we are located in the command console.
Adb pull filename source_path
For instance: adb pull despacito.mp3 / sdcard / trash can

5 # adb reboot
With this command we will restart the Android device directly from the command console.
For instance: adb reboot
6 # adb reboot-bootloader
As with the previous command, we will restart the terminal, but this time loading the bootloader menu of the device. Thing that can come in handy if we are salting with ROMs and root permissions.
For instance: adb reboot-bootloader
7 # adb reboot-recovery
With this command we restart the device, loading the recovery mode. Like the previous one, it is a very simple command.
For instance: adb reboot-recovery
8 # fastboot devices
When we are inside the bootloader, being outside the Android operating system we will not be able to execute the adb commands. Instead we will need the fastboot commands.
With the fastboot devices command we can confirm if our Android has fastboot mode enabled and if there is communication between the device and the PC.
For instance: fastboot devices

9 # adb shell
The adb shell command is one of the most complex and advanced. On the one hand, we can simply write "adb shell" and we will see the content and permissions of the terminal files and folders.
We can also perform more advanced actions such as changing permissions or running a script from the device shell.
Adb shell
For example: adb shell chmod 666 /sdcard/morralla/despacito.doc
10 # adb logcat
With this last command we can see the logged event logs on the device. Especially oriented to developers and similar (although if you are a little curious you can have a good time watching data lines and commands on your computer screen).
For instance: adb logcat
As an extra, if you have a Pixel or Nexus phone, you can also use the command "fastboot oem unlock" for unlock the bootloader of your terminal using this simple command.
Other ADB Commands for Advanced Users
If you have been wanting to learn a little more about Android ADB commands, then I leave you a very interesting link where you can see all the ADB commands and how to put them into practice.
You have Telegram installed? Receive the best post of each day on our channel. Or if you prefer, find out everything from our Facebook page.