Sometimes the inevitable happens, and after so much use of our pendrive or USB memory in the end it ends up failing. This can be translated in several ways: it does not read the contents of the disk, the PC does not recognize the pendrive, or we simply have problems opening some stored files. In today's tutorial, we will see how to solve it and we will learn how to Repair a Damaged USB Flash Drive Using 3 Simple Techniques.
Basic guide to repair a pendrive or USB memory
The first thing we have to assess is the type of failure our storage device has suffered: a software failure (it does not read the contents of the disc) is not the same as a hardware failure (it has received a blow or has gotten wet, etc.).
In my case, I had a pendrive that I had used to install a portable version of Android for PC, which finally ended up giving several errors. The file system was gutted and it didn't even allow me to format the disk. Do you want to know how I solved it?

In the following guide we will see 3 different methods to repair a damaged USB disk. It is recommended to start with the first, and if it does not work, try the second and third methods (the latter is the most effective).
To bring these 3 tests to fruition we will need:
- A Windows PC (XP / 7 / 8.1 / 10).
- The damaged pendrive. Also valid for SD or micro SD memories (if we have an adapter to connect them to the PC).
- Want to dip a bit.
1 # Use the CHKDSK command to repair disk errors
The first thing we will do is connect the USB memory to a Windows PC. Once the system recognizes the disk, we will go to "Start -> Run", we will write the command "cmd" (without quotes) and we will press enter. In the case of Windows 10, we can type this command in Cortana directly to open the command prompt (MS-DOS).
IMPORTANT: For all this to work we must open the command prompt with administrator permission:
- If we use Cortana in Windows 10 we will write "cmd" and click on «Execute as an administrator»By right clicking with the mouse on the program icon.
- In the case of previous versions of Windows (and in the same Windows 10 as well) we can go to the route C: \ Windows \ System32, right click on "cmd.exe" and select "Run as administrator".
Now we go to the black MS-DOS window and type the following command: «chkdsk / x / f G: » (without quotes), where G corresponds to the drive letter assigned to the USB. In the screenshot of the image, the letter of my pendrive is (F :).

With this command, the system will look for errors in the USB memory, and if it finds any, it will try to repair it.
NOTE: When launching the chkdsk command we can get the error «cannot open volume for shortcut«. This means that there is an external program that is blocking access to the USB drive. Usually it is usually the antivirus or some disk monitoring tool. Try to locate the program, disable it, and relaunch the command.
2 # Format the pendrive or USB memory
If the CHKDSK command fails to solve the problem, we will try to format the pendrive. We will lose the data stored on the disk, but it is likely that this way the device will work again, so let's keep that in mind!
To format an external storage disk or a USB memory in Windows we simply have to open the window "Team", Select the pendrive drive, and with the right button select"Format”.
We uncheck the option of "Quick format"And click on"Start”.

3 # DISKPART, the definitive repair
If neither of these 2 methods has worked for us, it is time to take out the heavy artillery. We reopen a command window (writing "cmd"Or"symbol of the system"In Cortana or from the" Start -> Run "button).
Note: It is important to open the terminal window with administrator permission (As we indicated in method # 1 at the beginning of the post), if not, we may get an error of insufficient permissions.
Next, we execute the following series of commands in this order:
- “diskpart”: With this command we access the disk partition.
- “list disk”: Here we ask you to show us a list of the discs. We will identify the pendrive by the size shown on each of the disks.
- “select disk NUMERO_DE_DISCO_DEL_USB": If the pendrive is disk 2, for example, we will write the command"select disk 2”.

- “clean": With this command we clean the USB memory.
- “create partition primary”: Now we create a primary partition.
- “select partition 1": We select the partition we just created.
- “active”: We mark the partition as active.
- “format fs = FAT32”: With this command we format the USB disk.
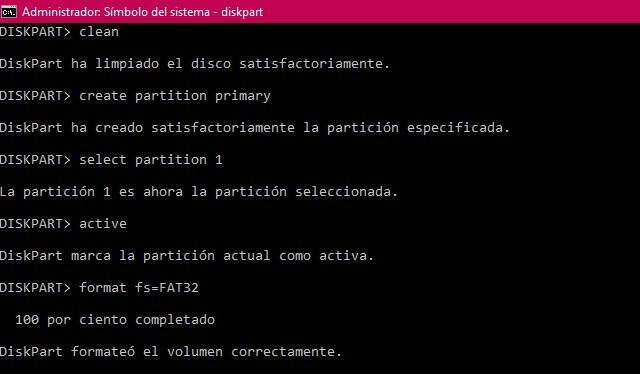
Once all the steps have been followed, if everything has gone well, we will have a formatted disk, readable and ready to store new data and files on it. Yes of course!
If there is still any doubt, I attach the following video where I develop all the methods "live and direct", one by one:
Solutions for possible failures and errors during the repair process
Depending on the state of the pendrive, we may encounter some of these errors during the "sanitation" process. Here I will try to collect all those common problems that you have transferred to me in the comments area.
"Virtual disk service error"
Within the virtual disk service error failures we can find a few variants:
- «Virtual Disk Service Error: No Media on Device«. This failure means that the system is unable to communicate with the USB memory. For the PC it is an empty drive. As a consequence, you cannot access the data stored on the drive.
- «Virtual Disk Service Error: Operation timed out«. What this message tells us is that an attempt has been made to contact the unit, but it does not respond.
- «Error diskpart has encountered an error: the request cannot be made due to an I / O device error«. As in the previous cases, we are facing a communication error between the USB memory and the computer.
- «DiskPart has encountered an error: Device is not ready«. Again, this error tells us that the Windows system cannot contact the USB drive.
These 4 errors related to the virtual disk often mean that the pendrive has a hardware failure.
If the USB has gotten wet we can try putting it in a rice bag for a couple of days. We let it absorb moisture well and try to connect it again.
If the case is that it has been hit or it has simply been a long time that we have not used it, it is possible that it has deteriorated or spoiled forever.
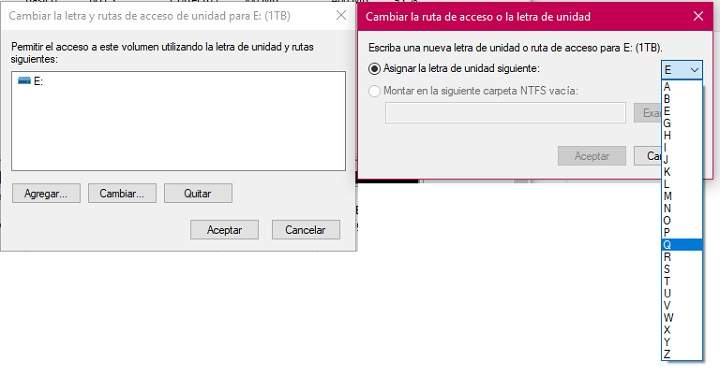
Faced with this situation, there is really little we can do. The possibility remains that all this comes from an error when assigning a drive letter, although it is unlikely. It is a failure that arises when we connect a USB with a letter that is already assigned to another disk on the PC (another pendrive, the computer's own hard disk, etc.). We can try to solve it by changing the letter assigned to the pendrive:
- We open the «Disk management»(From the control panel or from Cortana).
- We select our pendrive and by right clicking we click on «Change drive letter and paths«. We assign a new letter (which is free and unused) and save the changes.

 "Virtual disk service error: The media is write-protected"
 "Virtual disk service error: The media is write-protected"
This error tells us that the pendrive or USB memory only has read permissions. Normally we can solve it by moving the write lock tab that most USBs on the market usually incorporate.
In case of not having any tab, we can also obtain write permissions by executing the command «attributes disk clear readonly"(Without quotes) in MS-DOS, just before running the" clean "command in method # 3.
"Virtual disk service error: volume is too small"
Another bug with the virtual disk, but this time we can fix it without too much drama. All we have to do is format the USB in NTFS format instead of FAT32.
To do this, when we are performing the formatting by means of commands, instead of using the command «format fs = FAT32»We will use«format fs = NTFS«.
If this does not work, we will perform the following series of commands:
- diskpart
- clean
- convert gpt
- format fs = NTFS
"The volume is too big"
We continue with another virtual disk failure when trying to format our pendrive. In this case the problem is that Windows is not capable of format any disk to FAT32 larger than 32GB. A rather curious fact considering that the system is capable of mounting and reading larger units.
In any case, to be able to format a USB drive that has a size of 1TB, 500GB or similar, we will have to use a third-party application that is enabled to format this type of disk. A good free tool to carry out this process is FAT32 Format (available HERE).

"Chkdsk is not available for RAW files"
This error will appear when trying to repair disk failures with the chkdsk command. When a drive is in RAW format it means that has lost its file format. Therefore, in order to run the disk check tool we will first have to format it (as explained in methods # 2 and # 3).
"Access denied because you have insufficient privileges"
I have commented on it a couple of times during the tutorial, but if we do not run the MS-DOS window with administrator permissions we will get this error. We can fix it by simply doing this:
- If we use Cortana: We wrote "cmd«, And when the command symbol icon appears, instead of clicking on it we right click and select«Execute as an administrator«.
- In versions prior to Windows 10: We move to the C: \ Windows \ System32 folder and look for the executable «cmd.exe». We right click on the file while pressing the «shift» key and select «Execute as an administrator«.
I hope this little tutorial is useful for you, and as always, we'll see you in the comments area for anything.
You have Telegram installed? Receive the best post of each day on our channel. Or if you prefer, find out everything from our Facebook page.